JIANGMEN, GUANGDONG, CHINA, November 3, 2026 /EINPresswire.com/ — Clean Stainless Steel Cookware: 10 Honest Steps
The honest truth about clean stainless steel cookware care: most of what people think will damage a stainless pan actually won’t, and most of what people do to keep it shiny is unnecessary. A 304 stainless interior with a brushed or polished finish is tougher than it looks. A few wrong moves (steel wool on a polished exterior, oven cleaner left to soak overnight, the dishwasher every day for a decade) will dull the shine before they damage the metal. The goal of any clean stainless steel cookware routine is simple: remove food, remove mineral deposits, keep the exterior looking like the day it left the factory, and don’t use anything the manufacturer didn’t intend you to use.
We’ve been cooking with and shipping stainless steel cookware out of Jiangmen, Guangdong since 2003. Both our Encapsulated Bottom sets and our Whole-Clad sets run side by side, and what we cover here applies to either construction. We’ve heard every cleaning horror story: the pan left on a burner until the food carbonised, the steel-wool scrub on a mirror-polished lid, the dishwasher cycle run daily for years. None of those destroyed the pan. Most of them only hurt the look. This guide covers the clean stainless steel cookware approach that brings a stainless pan back from the worst of those, plus the small daily habits that keep it there.
Clean Stainless Steel Cookware: The Short Verdict
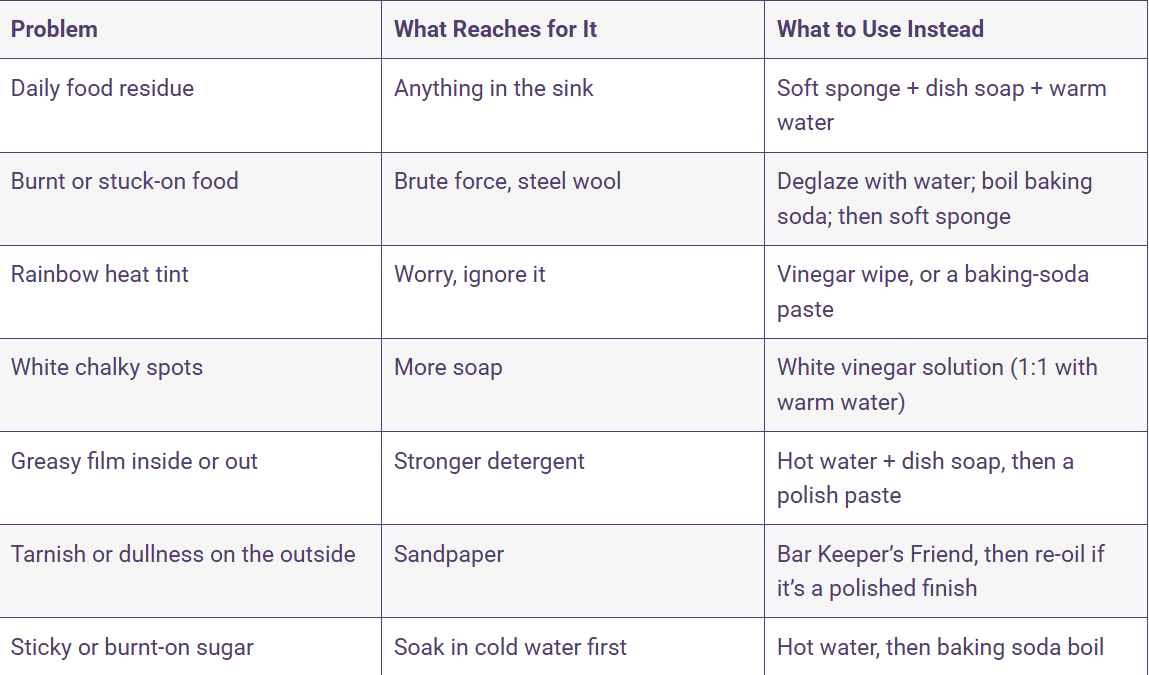
If you only have 60 seconds, this is the answer. The rest of the article is the reasoning behind every step.
Step 1: Daily Wash (Soap, Warm Water, Soft Sponge)
This handles 90% of the work. The daily version takes about 90 seconds.
Let the pan cool for a minute or two after cooking. Putting a screaming-hot pan under cold water warps bonded bases over time. A 30-second wait is enough.
Run the pan under hot tap water and add a drop of dish soap.
Use a soft sponge or a dish cloth and wipe the interior in circular motions.
Rinse under hot water.
Shake off the water and move to Step 7 (dry).
Most stainless steel cookware brands recommend dish soap and a soft sponge as the only daily clean stainless steel cookware routine, and they’re not being conservative. There really isn’t a need for more.
What not to do daily: use steel wool, which can leave traces that rust on a 304 surface; use abrasive powders such as Bar Keeper’s Friend, which polish the brushed or satin finish smooth over time; or make the dishwasher the default (see Step 9). If you want a deeper walkthrough of how the surface behaves, our guide to how stainless steel cookware is made covers what the brushed or polished finish is actually doing to the metal.
Step 2: Remove Burnt Food (Deglaze or Boil It Out)
The first instinct when something is burnt onto a pan is to scrub harder. That’s the wrong instinct. The right move is to deglaze or boil the residue loose, then use a soft sponge.
Method A: Deglaze (light-to-medium sticking). Put the pan back on a low burner, add about half a cup of water (or stock, wine, or a splash of vinegar), and bring to a simmer. Use a wooden spoon or flat-edged spatula to scrape the bottom. Most food will lift within a minute.
Method B: Baking soda boil (medium-to-heavy burning). Add water to cover the burnt area, about 1 cm deep, plus 1–2 tablespoons of baking soda. Bring to a boil, then simmer steadily for 5–10 minutes. Let the water cool, then wipe with a soft sponge. The burnt layer usually comes off in sheets.
Both methods are the core of any clean stainless steel cookware approach for burnt food. Boiling water is the most underrated cleaning tool in a kitchen: the heat, the agitation and the steam do the work that scrubbing cannot, without touching the surface.
What to skip: vinegar boils, since baking soda is the safer boiling agent for a stainless pan, and oven cleaner in a sealed bag, which leaves caustic residue you’ll need to wash off several times. Baking soda handles the same job in 10 minutes.
Step 3: Remove Rainbow Heat Tint (Vinegar or Mild Abrasive)
Rainbow heat tint is a thin oxide layer that forms when stainless steel is heated past a certain temperature, usually above 260 °C. It is not damage. It is not rust. It is not harmful. It is the steel doing exactly what steel does at temperature. Most people don’t love the look, and the clean stainless steel cookware method to remove it is short:
Vinegar wipe (the simplest). Mix white vinegar and warm water 1:1, wipe the tinted area with a soft cloth, rinse and dry.
Baking soda paste (slightly more aggressive). Rub gently along the brushed or polished direction, then rinse and dry.
Oxalic acid cleaner (Bar Keeper’s Friend or equivalent). For a stubborn tint on a satin or brushed exterior, a small amount on a damp cloth removes the oxide quickly. Wipe with the grain, rinse, dry.
The tint does not affect cooking performance, food safety, or the lifespan of the pan. Once you understand that, you can ignore it on a pan you cook with every day and reserve the vinegar wipe for the pans you want to look new.
Step 4: Remove White Spots and Calcium Deposits
White chalky spots on a stainless surface are almost always mineral deposits left by hard water after the pan air-dries. They are calcium and magnesium carbonates from the water, not from the pan.
Mix white vinegar and warm water 1:1. Either lay a soaked cloth on the spots for 2–3 minutes, or fill the pan with the solution if the spots are on the interior. Wipe with a soft cloth, rinse with clean water, and dry with a soft towel. For heavier buildup, a paste of baking soda and water applied with a soft sponge and left for 5 minutes will finish the job.
If you live in a very hard-water area, this step will become a regular part of your clean stainless steel cookware routine. A 30-second vinegar wipe every week is faster than letting the deposits build up.
Step 5: Cut Grease Film Inside and Out
A greasy film on the outside of a stainless pan usually comes from cooking oil aerosolising in a hot pan and depositing on the cooler exterior over time. On the inside, it shows up as a thin oily layer that interferes with browning.
Wash the pan as in Step 1 with hot water and dish soap. For stubborn grease, make a paste of baking soda and dish soap (about 2:1 baking soda to soap), apply with a soft sponge in circular motions, and rinse thoroughly with hot water. Any soap film left behind is itself a problem when you next heat the pan. Then dry.
The mistake most people make here is reaching for a stronger degreaser from the garage or workshop. Most of those are designed for machine parts and contain solvents that should not be near food surfaces. Dish soap and baking soda cover every grease problem a kitchen pan will throw at you.
Step 6: Polish the Exterior (Mirror, Satin, or Brushed)
Polishing the exterior is the part of clean stainless steel cookware care that owners’ manuals usually skip, and the part that makes the most visible difference. Three exterior finishes behave differently:
Mirror polish. Highest shine, shows every fingerprint and water spot. Use a stainless steel polish applied sparingly with a microfibre cloth, buffed in the direction of the polish lines. Avoid abrasive powders, which leave a haze.
Satin / brushed finish. The most forgiving finish, and it hides water spots and minor scratches well. A baking soda paste wiped with the grain is usually all it needs. Avoid polishing against the grain.
Matte / bead-blasted. Hides everything and is hard to make shiny. Don’t try to polish it. Just soap, water, dry.
Products to consider include Bar Keeper’s Friend, Weiman Stainless Steel Polish, or a generic stainless cleaner. Avoid anything containing chlorine bleach, which can pit the surface over time. For pans shipped to retail, we polish and pack the exterior with a light protective film that washes off in the first wash. After that, the finish you see is the finish you keep.
Step 7: Dry Properly to Avoid Water Marks
This is the single step most people skip, and it does the most to keep a pan looking new. The minerals in tap water deposit on a stainless surface as the water evaporates. A pan that air-dries upside down on a rack develops a constellation of water spots. A pan that is towel-dried after every wash doesn’t.
Shake the pan to remove most of the water, then wipe the interior and exterior with a clean, dry microfibre cloth or a soft dish towel. This is also why commercial kitchens towel-dry every pan before stacking: it is faster than dealing with water spots later. Drying prevents the next round of cleaning, which makes the whole clean stainless steel cookware routine more effective.
Step 8: Don’t Use These (Harsh Chemicals and the Wrong Scrubber)
The clean stainless steel cookware “don’t” list is shorter than the “do” list, but its items cause the most lasting damage.
Steel wool on a polished or satin exterior. It will scratch the finish. Use it only on a heavy matte exterior, and only when other methods have failed.
Oven cleaner (sodium hydroxide / lye). It works, but leaves caustic residue that needs extensive rinsing. Reserve it for an absolute-last-resort job on a cheap secondary pan, not a clad or bonded cookware piece.
Chlorine bleach and bleach-based sprays. They will pit stainless over time. The pits are tiny but visible up close, and they make the surface harder to clean next time.
Magic eraser on a mirror finish. It is a fine abrasive that works but dulls the shine. Use it only on a satin or brushed exterior.
Sandpaper. For a brushed finish, 600-grit wet-and-dry used in the direction of the brush lines can re-establish the grain on a damaged spot. Anything lower than 400-grit is a scratch, not a fix.
If in doubt, do the soapy-water-and-soft-sponge version. For most stains it works, and for the rest, baking soda and vinegar cover what it can’t.
Step 9: Dishwasher — Yes or No, Honestly
The honest answer: most modern Encapsulated Bottom and Whole-Clad stainless steel cookware is dishwasher-safe. The “as the default” part is what wears the finish over time.
The dishwasher does a few things well: it gives consistent daily results with no effort, reaches the rivets and the inside of the handle where a sponge misses, and sanitises at high-temperature rinse cycles. Over years, though, the alkaline detergent gradually dulls a polished or satin exterior, hard-water spotting becomes harder to avoid, contact with other metal items in the rack can leave grey marks, and the high-temperature dry cycle is the harshest environment a pan sees.
The practical clean stainless steel cookware recommendation: run the dishwasher for daily loads, but pull the stainless out before the dry cycle and towel-dry. Or hand-wash the stainless and let the dishwasher handle the rest of the kitchen. Either way, the dishwasher is a tool, not a substitute for the routine. For a deeper look at how a bonded base handles repeated dishwashing, our cookware thickness guide covers the relationship between base thickness, layer count, and how the pan survives daily use.
Step 10: A Note From the Factory on Finish and Construction
We make two stainless product lines side by side in Jiangmen: Encapsulated Bottom Stainless Steel Cookware Sets (a disc of aluminium or copper encapsulated in a stainless base plate, with single-layer stainless walls) and Whole-Clad Stainless Steel Cookware Sets (multi-layer construction from base to rim, typically 3-ply or 5-ply). Both lines are open to OEM specification, both run on the same BSCI and ISO 9001 audits, and both ship to brands across the EU and Middle East. We also take on non-stick and coated cookware orders when a buyer’s program calls for them.
The factory-side view on what lasts through years of washing is short:
The interior 304 layer is the same metal all the way through. A scratch is a scratch. It doesn’t expose a coating that can peel, and the interior can take a soft abrasive, a metal spatula, a knife, and decades of soap.
The exterior finish is the part that ages. A mirror polish loses its mirror quality faster than a satin or brushed finish, and a brushed finish hides wear better than any other. The choice of finish is the single biggest factor in how the pan looks after five years of washing.
The bonded base is the part that’s hardest to repair. The aluminium or copper core inside a clad pan is encapsulated by stainless on both sides, so water and detergent do not reach it. The base delaminates only if the bond was poor in the first place, or if the pan was heated empty for an extended period. Neither is a cleaning problem.
Coated pans are a different article. For those, use a non-abrasive sponge, no metal utensils, and no high-heat empty preheats, and check the buyer’s spec for dishwasher use.
That is the entire factory-side summary of clean stainless steel cookware care: soap, water, a soft sponge, baking soda, vinegar, an occasional Bar Keeper’s Friend, and a towel at the end. No magic, no expensive products, no special tools.
FAQ: Clean Stainless Steel Cookware
Can I use steel wool on a stainless pan?On a heavy matte exterior, fine 0000 steel wool is fine. On a polished or satin exterior, no, because it scratches the finish. Use a soft sponge or a baking soda paste instead.
What removes burnt food from a stainless pan?Boil water and a tablespoon or two of baking soda in the pan for 5–10 minutes, then wipe with a soft sponge. For lighter sticking, deglaze with a half cup of water on a low burner.
Why is my stainless pan rainbow-coloured?Heat tint, a thin oxide layer that forms when stainless steel is heated past about 260 °C. It is cosmetic, not damage. Wipe with white vinegar (1:1 with warm water) and a soft cloth, or use a baking soda paste.
Talk to the Factory
JC Cookware runs two stainless lines side by side in Jiangmen, Guangdong, Encapsulated Bottom Stainless Steel Cookware Sets and Whole-Clad Stainless Steel Cookware Sets, and takes on non-stick and coated cookware orders to customer specification. The factory is BSCI and ISO 9001 audited and has shipped to brands across the EU and Middle East since 2003. If you’re sourcing either construction and want a conversation about base layers, layer count and OEM terms, get in touch.
JC cookware
JC cookware
Legal Disclaimer:
EIN Presswire provides this news content “as is” without warranty of any kind. We do not accept any responsibility or liability
for the accuracy, content, images, videos, licenses, completeness, legality, or reliability of the information contained in this
article. If you have any complaints or copyright issues related to this article, kindly contact the author above.

Media gallery